I’ve been reviewing, for a while now, the opportunities that Embedded operating systems has to offer. If you take a look to previous posts of mine that I’ve prepared about XP Embedded you’ll find a quick introduction to the platform + the steps for building, preparing and deploying XP Embedded images in your environment, including deploying it on diskless devices (remote boot):
*Preparing and Installing Windows XP Embedded Images – Part I: Setting up the Environment
*Preparing and Installing Windows XP Embedded Images – Part II: Building Images
*Preparing and Installing Windows XP Embedded Images – Part III: Using Remote Boot
Windows Embedded 2009 Standard Overview
Windows Embedded 2009 Standard is the newest version of the Embedded operating systems released by Microsoft, succeeding Windows XP Embedded. These operating systems are oriented to special devices or computers, where you need a secure, small, reliable and manageable OS. WES 2009 contains the same kernel as Windows XP with a few improvements:
* Windows XP kernel with SP3 included
* Internet Explorer 7
* Windows Media Player 11
* Silverlight 1.0
* .Net Framework 3.5 (including also 1.0, 1.1 and 2.0).
* IPv6 support
For more information about Windows Embedded Standard 2009 check the following links:
- Windows Embedded Standard 2009 Home
http://www.microsoft.com/windowsembedded/en-us/products/westandard/default.mspx- [PDF] Windows Embedded Standard 2009 Overview
http://go2.wordpress.com/?id=725X1342&site=augustoalvarez.wordpress.com&url=http%3A%2F%2Fdownload.microsoft.com%2Fdownload%2F0%2F8%2Fa%2F08a3c3a2-7bd0-49ce-b232-b63c7e075f17%2FWindows%2520Embedded%2520Standard%2520Overview.pdf&sref=http%3A%2F%2Fblog.augustoalvarez.com.ar%2F2009%2F03%2F29%2Fwindows-embedded-standard-2009-step-by-step-deployment-part-i%2F- [PDF] Windows Embedded Standard 2009 Datasheet
http://go2.wordpress.com/?id=725X1342&site=augustoalvarez.wordpress.com&url=http%3A%2F%2Fdownload.microsoft.com%2Fdownload%2Fb%2F6%2F0%2Fb603257c-b437-4c4f-ab9d-0ef6c91e81e7%2FWindows%2520Embedded%2520Standard%2520datasheet_original_052308.pdf&sref=http%3A%2F%2Fblog.augustoalvarez.com.ar%2F2009%2F03%2F29%2Fwindows-embedded-standard-2009-step-by-step-deployment-part-i%2F- [PDF] Windows Embedded Kiosk Solutions
http://go2.wordpress.com/?id=725X1342&site=augustoalvarez.wordpress.com&url=http%3A%2F%2Fdownload.microsoft.com%2Fdownload%2F7%2Fc%2F6%2F7c69fe14-5499-49a5-901c-6c10a76b8765%2FWindowsEmbeddedEnterpriseKioskBrochure-FINAL-web.pdf&sref=http%3A%2F%2Fblog.augustoalvarez.com.ar%2F2009%2F03%2F29%2Fwindows-embedded-standard-2009-step-by-step-deployment-part-i%2F- Download Windows Embedded Standard 2009 Trial
http://go2.wordpress.com/?id=725X1342&site=augustoalvarez.wordpress.com&url=http%3A%2F%2Fdownload.microsoft.com%2Fdownload%2F7%2Fc%2F6%2F7c69fe14-5499-49a5-901c-6c10a76b8765%2FWindowsEmbeddedEnterpriseKioskBrochure-FINAL-web.pdf&sref=http%3A%2F%2Fblog.augustoalvarez.com.ar%2F2009%2F03%2F29%2Fwindows-embedded-standard-2009-step-by-step-deployment-part-i%2F
So, after a quick review, let’s start with the step-by-step guide for building and deploying Windows Embedded 2009 Standard images, including the remote boot process.
So, after a quick review, let’s start with the step-by-step guide for building and deploying Windows Embedded 2009 Standard images, including the remote boot process.
Requirements
We will consider installing all the WES roles within the same machine, including the DHCP server (necessary for the remote boot environment).
Valid Operating Systems
- Windows XP Pro SP2 or higher
- Windows Server 2003 SP1 or higher
- Windows Vista
- Windows Server 2008
Roles
- DHCP Server available on the network
On our case we’ll have this role on the same machine.
Valid Database Engines
- SQL Server 2005 SP1 or higher
- SQL Server 2005 Express Edition SP1 or higher *
- SQL Server 2008
- SQL Server 2008 Express Edition
*: Windows Embedded Standard 2009 installation media already includes the SQL Server 2005 Express Edition SP2.
DHCP Configuration
Remember that this role and configuration it’s used only to achieve remote boot on diskless devices. It’s to necessary if that’s not your environment.
The same procedure used for XP Embedded is needed. Check this link for more information.
http://msdn.microsoft.com/en-us/library/dd128762.aspx
C:\WINDOWS\system32>netsh
netsh>dhcp
netsh dhcp>server \\<server_machine_name>
netsh dhcp>add optiondef 60 PXEClient String 0 comment=PXE support
netsh dhcp>set optionvalue 60 STRING PXEClient
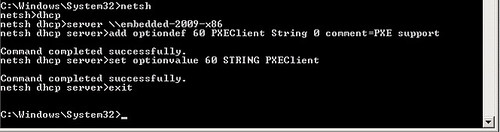
To verify the correct configuration, an option should be added and set on your DHCP server. You can check it on the DHCP Snap-In > Server Options.

Windows Embedded 2009 Standard Installation Step-by-Step
Well the process is quite simple, so you should not have any problem following it. But you’ll probably find a small issue within the procedure, let’s take a look:
1. Using the WES 2009 media, start the wizard from the autorun menu.
2. Insert the Product Key that you were given when you registered for the download.

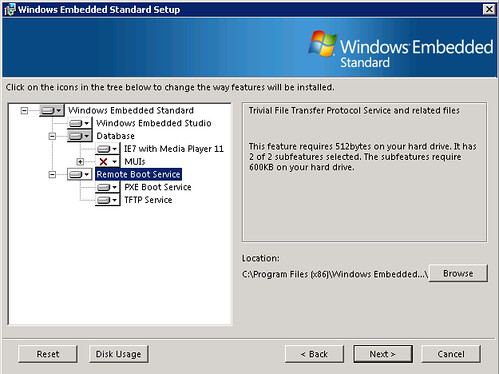
3. Select “Custom” installation.

4. On the components to be installed, check also the entire feature for “Remote Boot Service”.
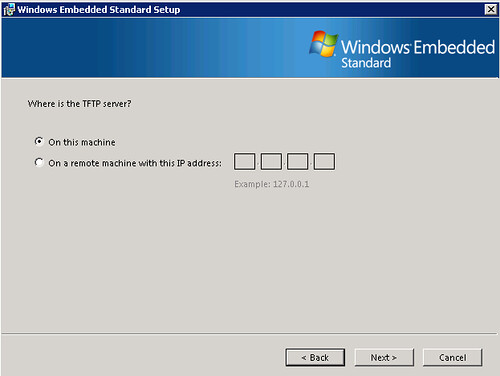
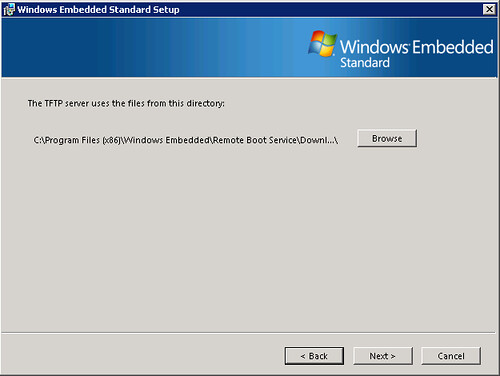
5. For the TFTP server, select “On this machine”.
6. Accept the default directory and click on “Next”.
7. Now select the SQL Server where the DB should be stored. I’m selecting it the local SQL Server Express instance already installed. Click on “Next”.

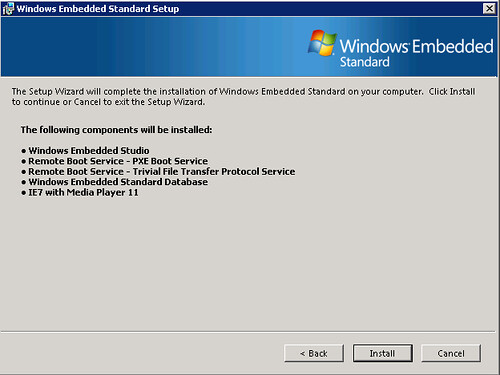
8. On the summary click on “Install”.
Here’s where you should find a problem. In the middle of the installation process this message will appear:
Windows Embedded Standard Error: WeUpdate.
D:\Setup\WMP11.exe failed. Return value = 0×40

(Also the message could appear using other components besides WMP11, Windows Media Player).
The log file should have this message:
Solution
Wait 5-10 minutes and click on “Retry”.
You don’t believe it? Check this MSDN article about it.
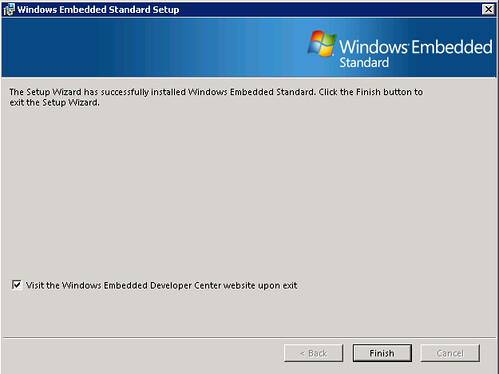
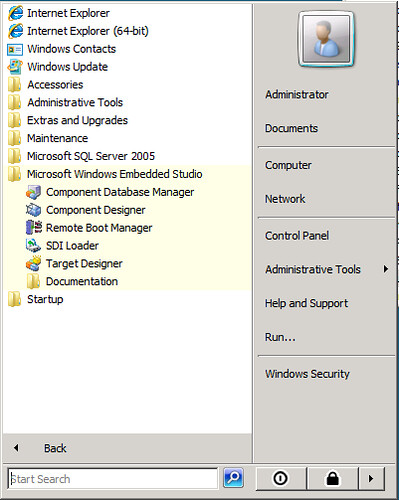
After that the installation should complete normally and you can access Windows Embedded 2009 Standard from the Start Menu.
8. On the summary click on “Install”.
Here’s where you should find a problem. In the middle of the installation process this message will appear:
Windows Embedded Standard Error: WeUpdate.
D:\Setup\WMP11.exe failed. Return value = 0×40
(Also the message could appear using other components besides WMP11, Windows Media Player).
The log file should have this message:
Windows XP Embedded Service Pack 3 Installer
Cannot connect to the database – please check the database.
Setup cannot continue.
No objects or files were imported to the database (local)\SQLEXPRESS.
WEUpdate Exiting with return code: 64
*** End of Run ***
Solution
Wait 5-10 minutes and click on “Retry”.
You don’t believe it? Check this MSDN article about it.
http://msdn.microsoft.com/en-us/library/bb521687.aspxIt’s related about how the installer access and closes the database during the installation process.
After that the installation should complete normally and you can access Windows Embedded 2009 Standard from the Start Menu.
Part II
Building the Image
1. Get hardware information from your target
This step is done with Target Analyzer, that is just an .exe file that compiles all of the hardware necessary information to be included on the image you are building. With the information gathered here, the corresponding drivers will be added to the image.
Since I’m using virtual machines in the same physical server, I’m going to collect hardware data in the same machine where I’m going to build the target image.
1.1 Open a cmd and focus on “C:\Program Files\Windows Embedded\utilities”.
1.2 Run “tap.exe”.
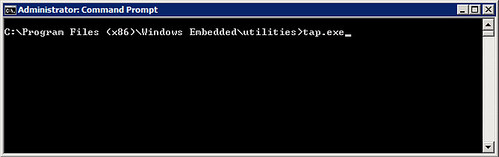
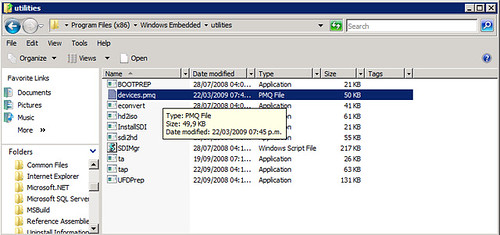
You’ll see that the program recollects information about your devices, and creates a new file on the same folder called “devices.pmq” containing all that data.
Target analyzer collecting information

The files devices.pmq contains all the hardware information
2. Adding the Drivers to the Image
The image builder from the Windows Embedded Standard 2009 suite is still Target Designer.
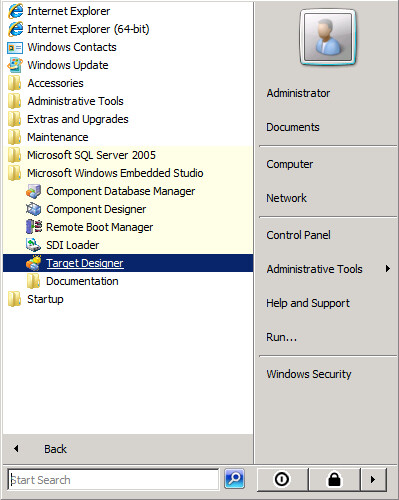
2.1 Open Target Designer from Windows Embedded Studio.
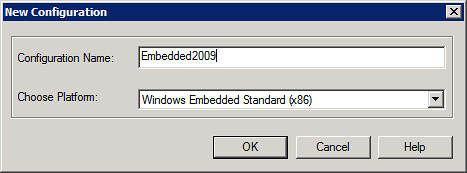
2.2 Select create a new image and we are going to name it Embedded2009
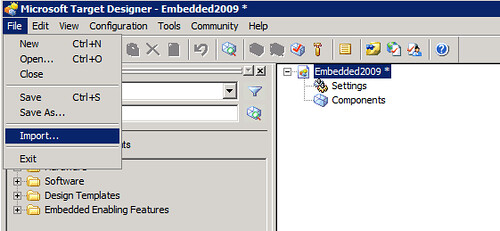
Now you have to start creating the image from scratch and the first thing we are going to do is import the hardware information we gathered from Target Analyzer.
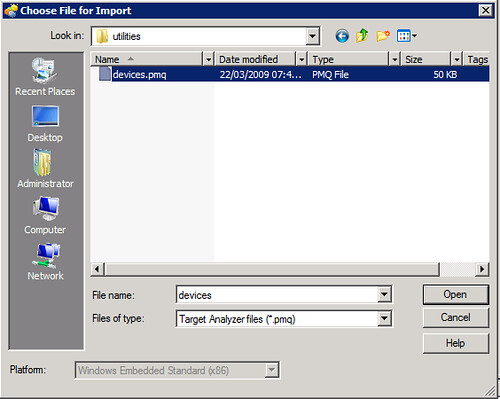
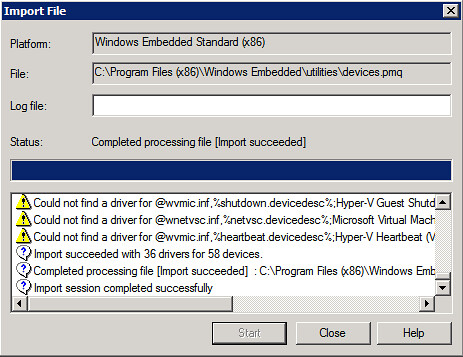
2.3 From “File” menu select “Import” and select “devices.pmq” created recently.
2.4 On the “Import File” window click “Start” and the importing process will begin.
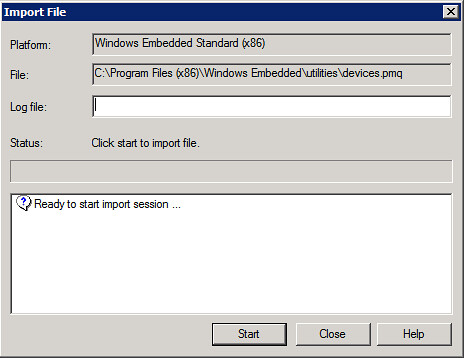
Once it’s completed, you can check any warnings generated. In my case, there are several warnings regarding virtual machines synthetic drivers, those can be ignored for now.
Building the Image
1. Get hardware information from your target
This step is done with Target Analyzer, that is just an .exe file that compiles all of the hardware necessary information to be included on the image you are building. With the information gathered here, the corresponding drivers will be added to the image.
Since I’m using virtual machines in the same physical server, I’m going to collect hardware data in the same machine where I’m going to build the target image.
1.1 Open a cmd and focus on “C:\Program Files\Windows Embedded\utilities”.
1.2 Run “tap.exe”.
You’ll see that the program recollects information about your devices, and creates a new file on the same folder called “devices.pmq” containing all that data.
Target analyzer collecting information
The files devices.pmq contains all the hardware information
2. Adding the Drivers to the Image
The image builder from the Windows Embedded Standard 2009 suite is still Target Designer.
2.1 Open Target Designer from Windows Embedded Studio.
2.2 Select create a new image and we are going to name it Embedded2009
Now you have to start creating the image from scratch and the first thing we are going to do is import the hardware information we gathered from Target Analyzer.
2.3 From “File” menu select “Import” and select “devices.pmq” created recently.
2.4 On the “Import File” window click “Start” and the importing process will begin.
Once it’s completed, you can check any warnings generated. In my case, there are several warnings regarding virtual machines synthetic drivers, those can be ignored for now.
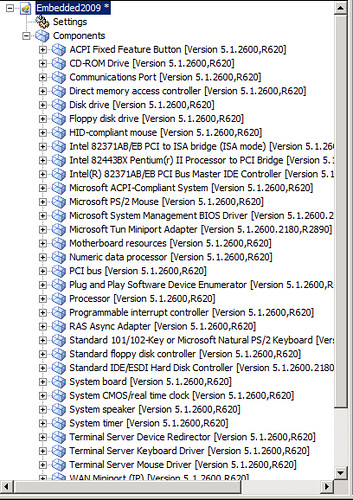
The image now is loaded with a bunch of hardware components that the image will use.
3. Using Design Templates and Adding Components
3.1 Check on the Target Designer left pane and expand the “Design Templates”.
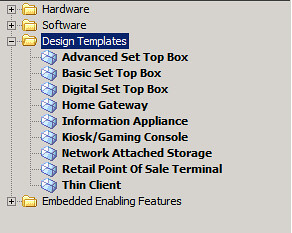
Here you’ll find common templates used when you are creating Embedded images. To find more information about each one, right click on the component and select “Help”.
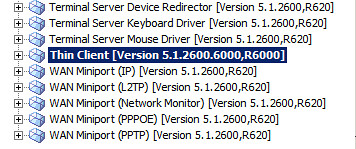
I’m going to select the “Thin Client” component. You can drag and drop the objects to your customized image or right-click and select “Add”.

This component will generate the necessary requirements that, when the dependency check is run, will add other components included on the database. We’ll see that step later on this post.
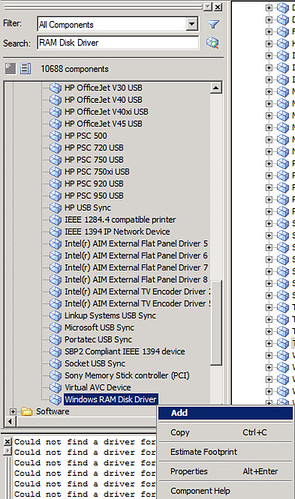
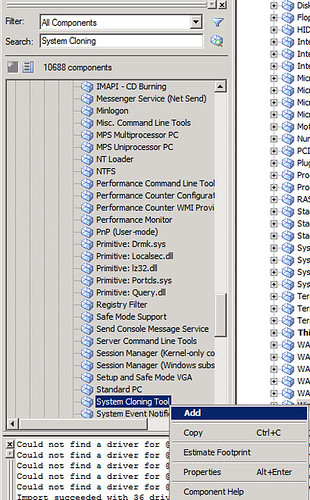
Since we are using a remote boot environment, two special components are needed to achieve it: RAM Disk Driver (will allow booting from RAM) and System Cloning Tool (will include a kind of sysprep step, called fbreseal, to make each image unique and avoid cloning SID, computer name, etc each time is deployed).
3.2 From the left pane, use the “Search” box and insert “RAM Disk Driver”.
3.3 The component is shown. Right-click on it and select “Add”.
3.4 Repeat the step for “System Cloning Tool” component.
Here’s the chance for you to add any other special component that you want on your image.
.Net Framework 3.5

Silverlight 1.0
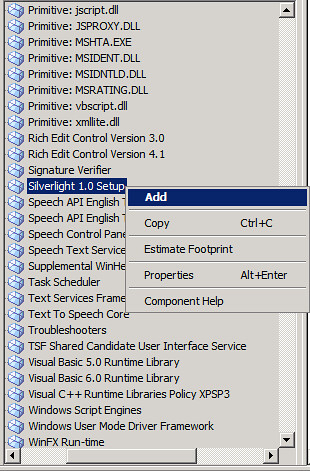
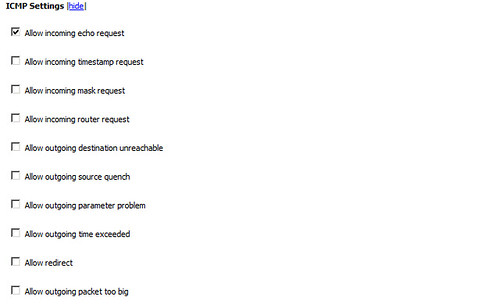
Or even more, you can set some of the components properties at this stage. For example: Windows Firewall.
Access Windows Firewall component settings

In here you’ll find much more options that the ones shown on XP Embedded
Turn on/off the Firewall by default on your image
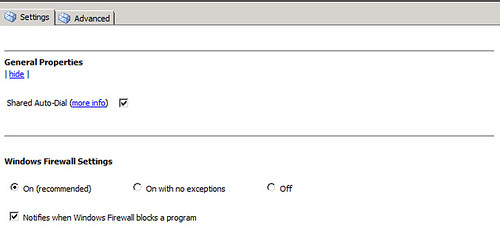
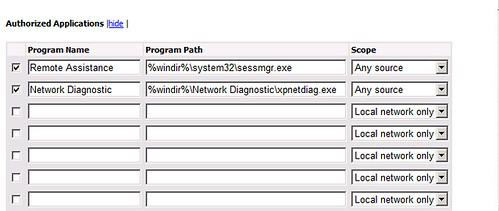
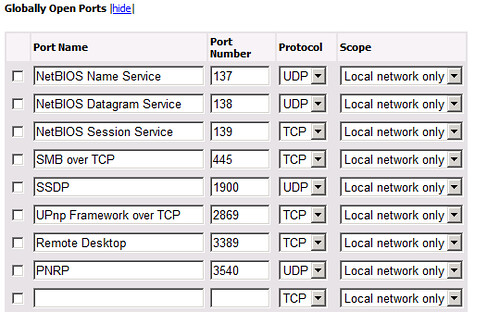
Setting Firewall’s exceptions
Authorizing applications
Opening ports
4. Checking and Solving Dependencies
The main step of the building process is checking the dependencies that are created soon as you add a component to your image.
At this point you’ve configured your image with the proper drivers, customized it adding components and setting their properties; now let’s check what dependencies are been set.
4.1 From “Configuration” select “Check Dependencies”.
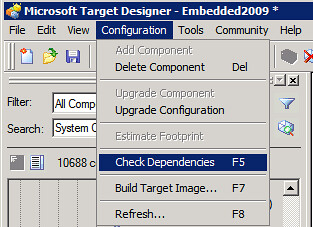
4.2 In the “Dependency Check” windows click on “Start”.
The process will start, it will take a few moments to complete. At the end of the process, you’ll see in the lower pane window all the messages that need attention before building the image.

Just double click on each of them to select the proper component to be added and solve the dependency.
Here are some of the common messages that you should see:
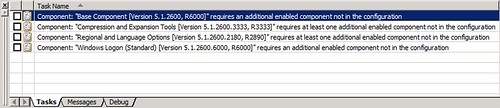
Component: “Base Component”. To solve it I’m selecting an standard component “Standard PC”.

Component: “Compression and Expansion Tools”. Solving it with “NTFS” component.

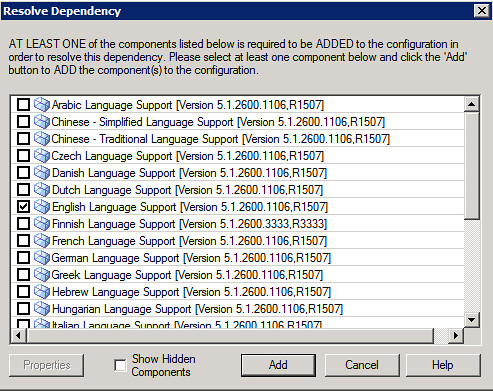
Component: “Regional and Language Options”. “English Language Support” to resolve.
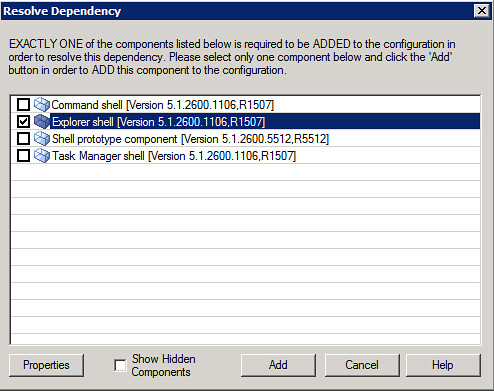
Component: “Windows Logon”. I’m selecting “Explorer Shell”.
Authorizing applications
Opening ports
4. Checking and Solving Dependencies
The main step of the building process is checking the dependencies that are created soon as you add a component to your image.
At this point you’ve configured your image with the proper drivers, customized it adding components and setting their properties; now let’s check what dependencies are been set.
4.1 From “Configuration” select “Check Dependencies”.
4.2 In the “Dependency Check” windows click on “Start”.
The process will start, it will take a few moments to complete. At the end of the process, you’ll see in the lower pane window all the messages that need attention before building the image.
Just double click on each of them to select the proper component to be added and solve the dependency.
Here are some of the common messages that you should see:
Component: “Base Component”. To solve it I’m selecting an standard component “Standard PC”.
Component: “Compression and Expansion Tools”. Solving it with “NTFS” component.
Component: “Regional and Language Options”. “English Language Support” to resolve.
Component: “Windows Logon”. I’m selecting “Explorer Shell”.
Soon as you click on “Add” on your last dependency, your image would seem to be ready to the build process, but not quite.
Since you’ve add new components with the dependency check, it’s highly recommended that you run the dependency check again for the new ones.
Soon as you finish this new “Dependency Check” and new and highly important component will appear to be added.
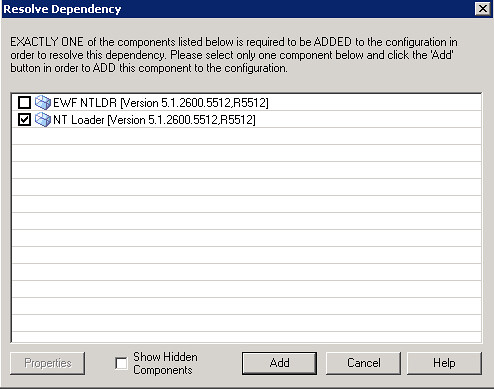
Select your boot loader. In my case I’m using the default loader for XP and 2003 environments: “NT Loader”. If you are trying to protect from any change to your boot environment, you can select “EWF NTLDR” component.
5. Building the Image
Ok, now that we’ve resolved all of the dependencies on our image, we can start building it.
5.1 From “Configuration” select “Build Target Image”.
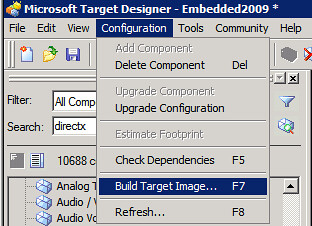
5.2 Select the folder where the image will be stored. The default folder is “C:\Windows Embedded Images”. Click on “Build”.

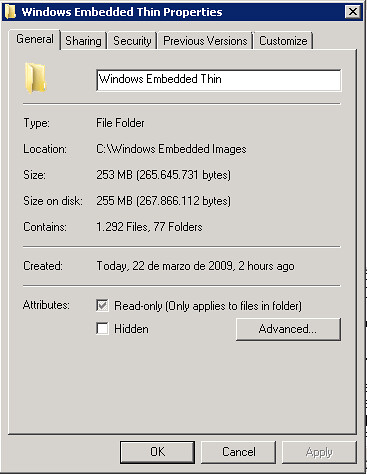
Once the build process is complete, you can check the files and folders created.
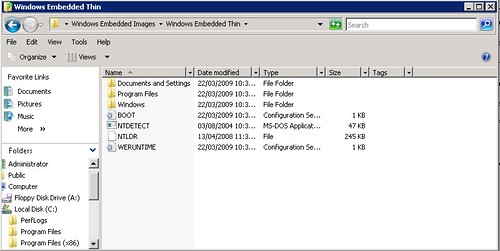
And verify the image size. In my case is 255mb.
Part III
After reviewing the necessary steps for preparing our environment (Part I) and building a custom image for a thin client (Part II); we’ll prepare the remote boot process as well as the remote boot server that will deploy that image on diskless devices.
If you prepared the same environment with the XP Embedded version, the process does not have much differences.
1. Set the Image Ready
Even though the building process of the image is complete, we need to run a few steps to set the image ready for deployment.
The First Boot Agent (FBA) needs to be executed one time to complete this process. By booting the image one time, the FBA makes a hardware detection and finishing some other tasks like network configuration. Also, these tasks executed by the agent can be customized; check this link about FBA.
The image is already built, so we are going to take those files to a new disk (virtual in my case) and boot a client machine from there.
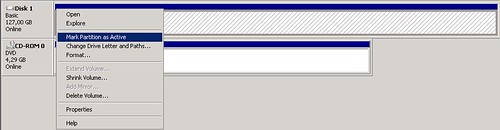
1.1 Add a second disk to the machine acting as Remote Boot Server. Create a new partition and set it to “Active”.
1.2 Copy the image files to that new logical disk.
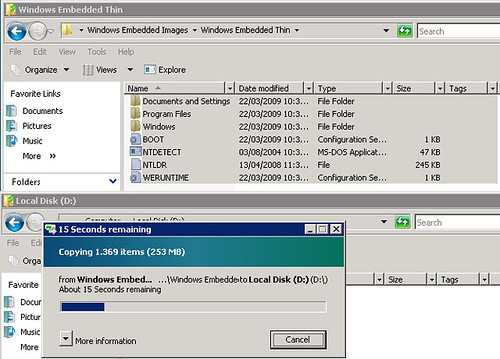
1.3 Like I said, I’m using a virtual environment, so my next step would be to create a new virtual machine, attach the virtual hard disk as primary and start the virtual machine.
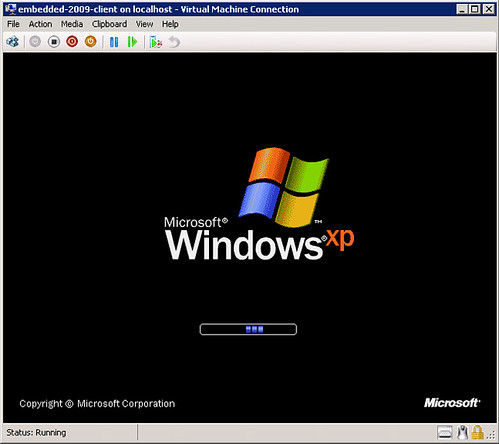
Since FBA contains several tasks to execute, could take a few moments to complete.
Soon as it completes, this message should appear: “Machine Released! Click to shutdown or reboot.”.
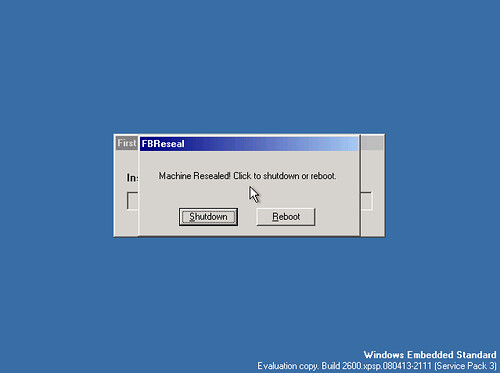
1.4 Select “Shutdown”. And I bet the next window will get you back some good old memories :)
Here comes an important note if you are planning a remote boot environment:
Since we’ve added the “System Cloning Tool” component and the image task sequences are now complete, every time this image is now booted will generate a new computer name, SID and other tasks that the fbreseal process executes to guarantee that there’ll be no cloned images on your environment. Quite similar as the sysprep process.
And it means that this image cannot be booted any more, otherwise the fbreseal process will be lost for next deployments.
1.5 Now you can attach the virtual disk back to the Windows Embedded remote boot server.
After reviewing the necessary steps for preparing our environment (Part I) and building a custom image for a thin client (Part II); we’ll prepare the remote boot process as well as the remote boot server that will deploy that image on diskless devices.
If you prepared the same environment with the XP Embedded version, the process does not have much differences.
1. Set the Image Ready
Even though the building process of the image is complete, we need to run a few steps to set the image ready for deployment.
The First Boot Agent (FBA) needs to be executed one time to complete this process. By booting the image one time, the FBA makes a hardware detection and finishing some other tasks like network configuration. Also, these tasks executed by the agent can be customized; check this link about FBA.
http://msdn.microsoft.com/en-us/library/ms912927%28WinEmbedded.5%29.aspx
The image is already built, so we are going to take those files to a new disk (virtual in my case) and boot a client machine from there.
1.1 Add a second disk to the machine acting as Remote Boot Server. Create a new partition and set it to “Active”.
1.2 Copy the image files to that new logical disk.
1.3 Like I said, I’m using a virtual environment, so my next step would be to create a new virtual machine, attach the virtual hard disk as primary and start the virtual machine.
Since FBA contains several tasks to execute, could take a few moments to complete.
Soon as it completes, this message should appear: “Machine Released! Click to shutdown or reboot.”.
1.4 Select “Shutdown”. And I bet the next window will get you back some good old memories :)
Here comes an important note if you are planning a remote boot environment:
Since we’ve added the “System Cloning Tool” component and the image task sequences are now complete, every time this image is now booted will generate a new computer name, SID and other tasks that the fbreseal process executes to guarantee that there’ll be no cloned images on your environment. Quite similar as the sysprep process.
And it means that this image cannot be booted any more, otherwise the fbreseal process will be lost for next deployments.
1.5 Now you can attach the virtual disk back to the Windows Embedded remote boot server.
Part III
After reviewing the necessary steps for preparing our environment (Part I) and building a custom image for a thin client (Part II); we’ll prepare the remote boot process as well as the remote boot server that will deploy that image on diskless devices.
If you prepared the same environment with the XP Embedded version, the process does not have much differences.
1. Set the Image Ready
Even though the building process of the image is complete, we need to run a few steps to set the image ready for deployment.
The First Boot Agent (FBA) needs to be executed one time to complete this process. By booting the image one time, the FBA makes a hardware detection and finishing some other tasks like network configuration. Also, these tasks executed by the agent can be customized; check this link about FBA.
The image is already built, so we are going to take those files to a new disk (virtual in my case) and boot a client machine from there.
1.1 Add a second disk to the machine acting as Remote Boot Server. Create a new partition and set it to “Active”.
1.2 Copy the image files to that new logical disk.
1.3 Like I said, I’m using a virtual environment, so my next step would be to create a new virtual machine, attach the virtual hard disk as primary and start the virtual machine.
Since FBA contains several tasks to execute, could take a few moments to complete.
Soon as it completes, this message should appear: “Machine Released! Click to shutdown or reboot.”.
1.4 Select “Shutdown”. And I bet the next window will get you back some good old memories
Here comes an important note if you are planning a remote boot environment:
Since we’ve added the “System Cloning Tool” component and the image task sequences are now complete, every time this image is now booted will generate a new computer name, SID and other tasks that the fbreseal process executes to guarantee that there’ll be no cloned images on your environment. Quite similar as the sysprep process.
And it means that this image cannot be booted any more, otherwise the fbreseal process will be lost for next deployments.
1.5 Now you can attach the virtual disk back to the Windows Embedded remote boot server.
2. SDI Loader
The Storage Device Image Loader will be in charge of emulating those set of files to act as booteable storage for your clients.
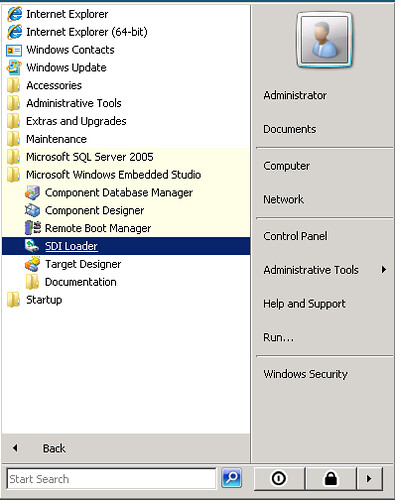
2.1 Open SDI Loader from Windows Embedded Studio.
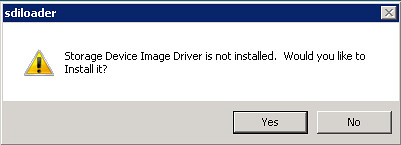
2.2 Click “Yes” to install the SDI Driver.
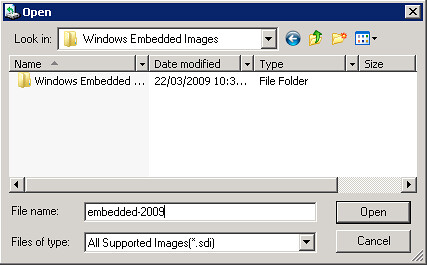
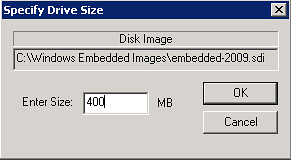
2.3 Click on “Add Disk” to generate a new .sdi file where the image will be stored.
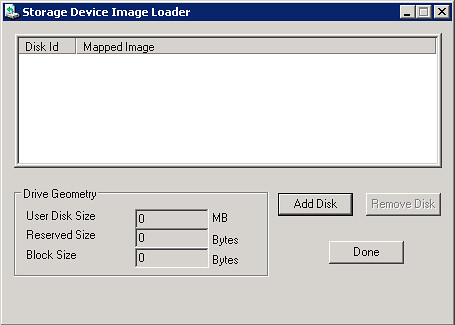
2.4 Choose name and location for the file.
2.5 Choose the size of the file. This .sdi file should be, at least, 25% bigger than the image size.
After reviewing the necessary steps for preparing our environment (Part I) and building a custom image for a thin client (Part II); we’ll prepare the remote boot process as well as the remote boot server that will deploy that image on diskless devices.
If you prepared the same environment with the XP Embedded version, the process does not have much differences.
1. Set the Image Ready
Even though the building process of the image is complete, we need to run a few steps to set the image ready for deployment.
The First Boot Agent (FBA) needs to be executed one time to complete this process. By booting the image one time, the FBA makes a hardware detection and finishing some other tasks like network configuration. Also, these tasks executed by the agent can be customized; check this link about FBA.
http://msdn.microsoft.com/en-us/library/ms912927%28WinEmbedded.5%29.aspx
The image is already built, so we are going to take those files to a new disk (virtual in my case) and boot a client machine from there.
1.1 Add a second disk to the machine acting as Remote Boot Server. Create a new partition and set it to “Active”.
1.2 Copy the image files to that new logical disk.
1.3 Like I said, I’m using a virtual environment, so my next step would be to create a new virtual machine, attach the virtual hard disk as primary and start the virtual machine.
Since FBA contains several tasks to execute, could take a few moments to complete.
Soon as it completes, this message should appear: “Machine Released! Click to shutdown or reboot.”.
1.4 Select “Shutdown”. And I bet the next window will get you back some good old memories
Here comes an important note if you are planning a remote boot environment:
Since we’ve added the “System Cloning Tool” component and the image task sequences are now complete, every time this image is now booted will generate a new computer name, SID and other tasks that the fbreseal process executes to guarantee that there’ll be no cloned images on your environment. Quite similar as the sysprep process.
And it means that this image cannot be booted any more, otherwise the fbreseal process will be lost for next deployments.
1.5 Now you can attach the virtual disk back to the Windows Embedded remote boot server.
2. SDI Loader
The Storage Device Image Loader will be in charge of emulating those set of files to act as booteable storage for your clients.
2.1 Open SDI Loader from Windows Embedded Studio.
2.2 Click “Yes” to install the SDI Driver.
2.3 Click on “Add Disk” to generate a new .sdi file where the image will be stored.
2.4 Choose name and location for the file.
2.5 Choose the size of the file. This .sdi file should be, at least, 25% bigger than the image size.
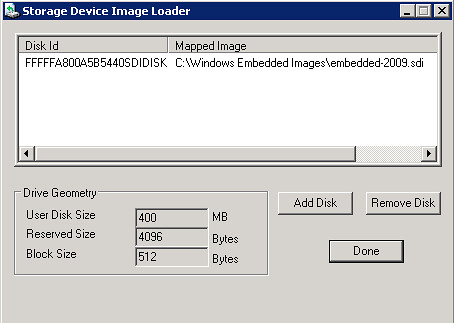
Once it’s selected, the new device is added to SDI Loader and to your operating system as a new drive.
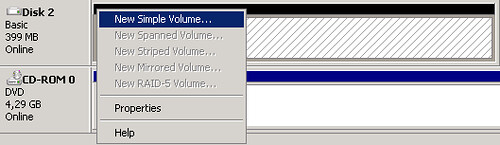
2.6 Open “Disk Management” to prepare the new virtual drive added to the system. Initialize disk.

2.7 Prepare the new volume following the wizard selecting it as “Primary Partition”.
2.8 Copy the image files (from the virtual disk that was used to boot one time) to the new virtual partition.

3. SDI Manager
Ok, now it is time to use some of options from the SDI Manager, that let us handle offline .sdi files.
We will generate a new SDI file that “Remote Boot Manager” will use to deploy on remote devices and machines.
3.1 Open a “cmd” and locate Windows Embedded Utilities “C:\Program Files\Windows Embedded\utilities”.
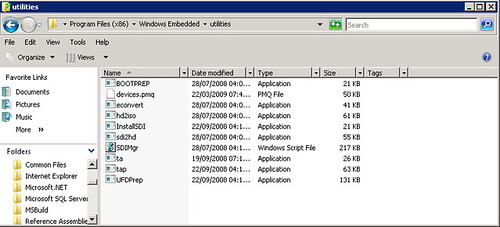
3.2 Create a new .sdi file using “SDImgr.wsf: cscript SDImgr.wsd /new c:\ramdisk.sdi”
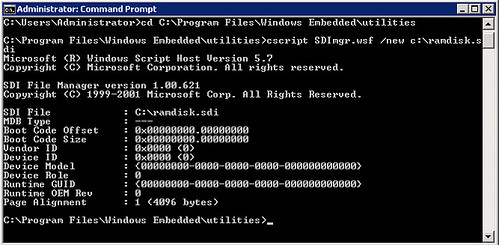
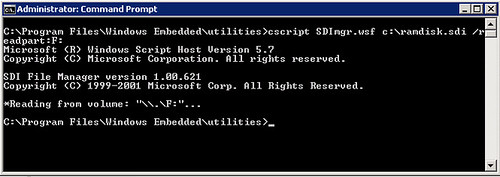
With the new file created, the next step is to read the image files located in the virtual partition (in my case, this partition is associated with the F:\ drive) to complete the process.
3.3 From “cmd” run: “cscript SDImgr.wsf c:\ramdisk.sdi /readpart:F:”
64bits Operating System Issue
The SDI driver has an issue if you are using x64 operating system, like Windows Server 2008. If you try running any of the SDI Manager options, like the ones mentioned above, you will see this error:
“ActiveX component can’t create object: ‘SDIAUT.SDI’”

Even though the script used by x86 and x64 operating systems is the same, on a 32bit environment you won’t see this issue.
2.6 Open “Disk Management” to prepare the new virtual drive added to the system. Initialize disk.
2.7 Prepare the new volume following the wizard selecting it as “Primary Partition”.
2.8 Copy the image files (from the virtual disk that was used to boot one time) to the new virtual partition.
3. SDI Manager
Ok, now it is time to use some of options from the SDI Manager, that let us handle offline .sdi files.
We will generate a new SDI file that “Remote Boot Manager” will use to deploy on remote devices and machines.
3.1 Open a “cmd” and locate Windows Embedded Utilities “C:\Program Files\Windows Embedded\utilities”.
3.2 Create a new .sdi file using “SDImgr.wsf: cscript SDImgr.wsd /new c:\ramdisk.sdi”
With the new file created, the next step is to read the image files located in the virtual partition (in my case, this partition is associated with the F:\ drive) to complete the process.
3.3 From “cmd” run: “cscript SDImgr.wsf c:\ramdisk.sdi /readpart:F:”
64bits Operating System Issue
The SDI driver has an issue if you are using x64 operating system, like Windows Server 2008. If you try running any of the SDI Manager options, like the ones mentioned above, you will see this error:
“ActiveX component can’t create object: ‘SDIAUT.SDI’”
Even though the script used by x86 and x64 operating systems is the same, on a 32bit environment you won’t see this issue.
4. Configuring Remote Boot Manager
Remote Boot Manager and the DHCP role configured earlier, will be in charge of answering remote and diskless clients with the proper boot image.
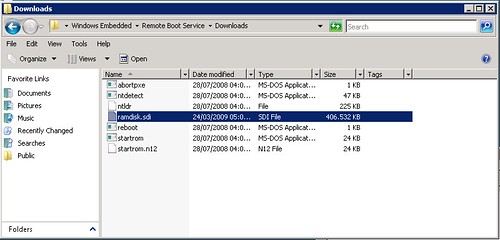
4.1 Place the “ramdisk.sdi” file configured earlier inside this folder “C:\Program Files\Windows Embedded\Remote Boot Service\Downloads”.
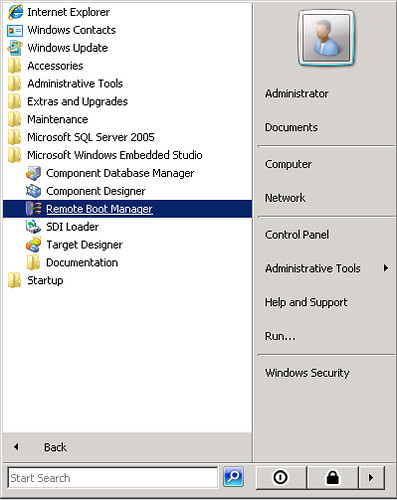
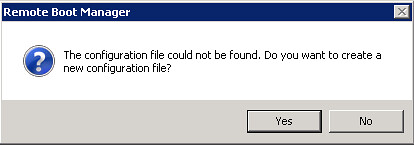
4.2 Open "Remote Boot Manager” from Windows Embedded Studio.
4.3 Click “Yes” to create a new configuration file.
Once the Remote Boot Manager window opens, you need to add each client device or machine with their specific MAC Address. For that, we’ll take a look at the virtual machine client’s configuration.
4.4 To achieve booting from the network when you are using Hyper-V, you need to add a “Legacy Network Adapter” on the client machine and specify an static MAC Address.
4.5 With that, you are ready to complete the data from Remote Boot Manager.
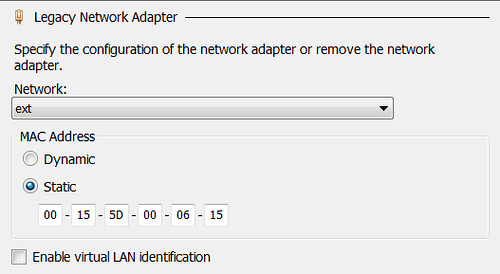
Client MAC Address: Assigned statically.
Description: (optional).
Boot Server: Default value (0.0.0.0) to select local machine.
Boot Program: startrom.n12. This program will request F12 confirmation for booting from the network. You can also select startrom to access directly to the boot image without requiring confirmation.
Boot Image: ramdisk.sdi. Remember that the image should be placed inside “C:\Program Files\Windows Embedded\Remote Boot Service\Downloads”.
Boot Parameters: (optional).
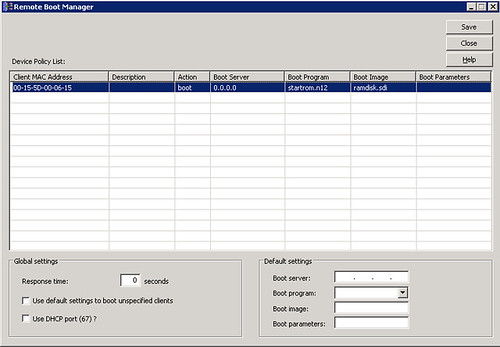
Now your environment is set to go.
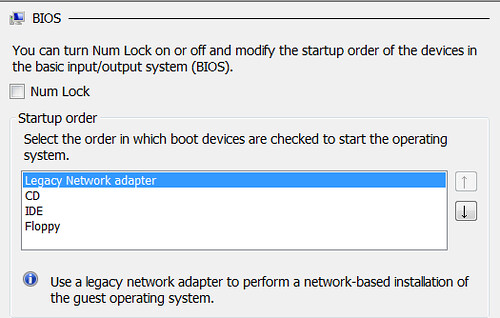
Make sure that your client machine has the correct configuration to boot from the network.
Loading the image remotely.
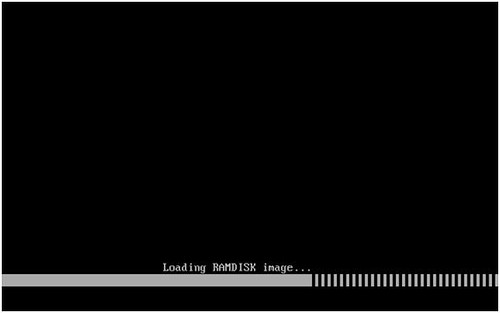
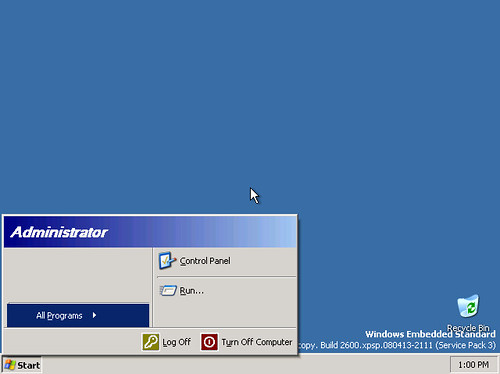
Windows Embedded image booting.

Desktop ready for use.
More Information
Enjoy!!!
Remote Boot Manager and the DHCP role configured earlier, will be in charge of answering remote and diskless clients with the proper boot image.
4.1 Place the “ramdisk.sdi” file configured earlier inside this folder “C:\Program Files\Windows Embedded\Remote Boot Service\Downloads”.
4.2 Open "Remote Boot Manager” from Windows Embedded Studio.
4.3 Click “Yes” to create a new configuration file.
Once the Remote Boot Manager window opens, you need to add each client device or machine with their specific MAC Address. For that, we’ll take a look at the virtual machine client’s configuration.
4.4 To achieve booting from the network when you are using Hyper-V, you need to add a “Legacy Network Adapter” on the client machine and specify an static MAC Address.
4.5 With that, you are ready to complete the data from Remote Boot Manager.
Client MAC Address: Assigned statically.
Description: (optional).
Boot Server: Default value (0.0.0.0) to select local machine.
Boot Program: startrom.n12. This program will request F12 confirmation for booting from the network. You can also select startrom to access directly to the boot image without requiring confirmation.
Boot Image: ramdisk.sdi. Remember that the image should be placed inside “C:\Program Files\Windows Embedded\Remote Boot Service\Downloads”.
Boot Parameters: (optional).
Now your environment is set to go.
Make sure that your client machine has the correct configuration to boot from the network.
Loading the image remotely.
Windows Embedded image booting.
Desktop ready for use.
More Information
http://msdn.microsoft.com/en-us/library/ms838569%28WinEmbedded.5%29.aspx
Enjoy!!!
ReplyDeleteThis post is very inspiring to me and it's very nice. I expect more info about this title and Thanks for your sharing...!
Spark Training in Chennai
Spark Training
Embedded System Course Chennai
Linux Training in Chennai
Social Media Marketing Courses in Chennai
Pega Training in Chennai
Primavera Training in Chennai
Unix Training in Chennai
What a great post it was. I have bookmarked this blog for my future reference. Thanks for sharing.
ReplyDeleteEnglish Speaking Classes in Mumbai
English Speaking Course in Mumbai
Best English Speaking Classes in Mumbai
Spoken English Classes in Mumbai
English Classes in Mumbai
Spoken English in Chennai
IELTS Coaching in Chennai
IELTS Coaching Centre in Chennai
IELTS Training in Chennai
IELTS Classes in Mumbai